Monday, June 3, 2013

Key Lime Cheesecake

Last week, my dad called me to ask if I'd make a cake for my mother's birthday. 

Now I had already planned to make a something (not sure it was going to be cake) for her birthday, but I was still very surprised at his call.

Mostly because when I was a kid, I always had to remind my dad that Mom's birthday was coming up.

Coincidentally, the morning of his call, I had been texting my sister about what I should make.

Black Forest cake?  She likes cherries.

Cheesecake?  And if so, what kind?

She likes key lime pie... Could I make a key lime cheesecake?

Well, obviously I could.  But would it be any good??

And Black Forest cake would certainly be easier...

And as I don't live anywhere near Florida, it wouldn't be real key lime cheesecake.

But in the end, key lime cheesecake won anyway.

Because I bought a silicon springform pan several months ago, and I hadn't tried it out yet.

So without Further adieu...

Key Lime Cheesecake:
Ingredients:
Graham crackers
Butter
3 8 oz. blocks softened cream cheese
3 eggs (separated - yolks in one bowl, whites in the other)
3/4 cup sugar (divided)
vanilla
4-5 limes
1 can sweetened condensed milk (it only comes in one size)
1 cup heavy whipping cream
powdered sugar

Directions:
1.  Preheat oven to 325 degrees.  Zest as many limes as you need to render 1 tablespoon of lime zest.  Be careful to only zest the peel and not zest into the rind.  The rind is bitter and will make your cake bitter.  Once you've zested your limes, roll them on the counter, using a good bit of pressure to soften them.  This makes them much easier to squeeze.  Juice as many limes as you need to render 1/2 cup of lime juice.  Add 2 tablespoons of orange juice to your lime juice.*  Set aside juice and zest for later use.

2.  In a food processor, crush 1 1/2 packs of graham crackers (you know how they come in envelopes in the box? You want to use 1 1/2 of them).  This will yield approximately 2 cups of graham cracker crumbs.  (You can also buy graham cracker crumbs at the grocery store and skip this step.

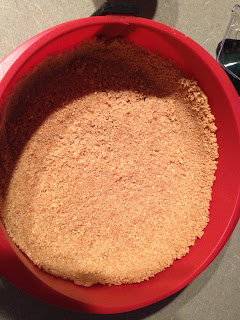
3.   Melt 6 tablespoons of butter and mix well with graham cracker crumbs.  Dump crust mixture into springform pan.  Using a measuring cup (or your hands) form crumbs along bottom and up sides of pan. Use the measuring cup.  Really.  It's so much easier.


4.  Place softened cream cheese in your mixer and beat on medium speed until smooth.**  Add 1/2 cup sugar, 1 teaspoon vanilla, and egg yolks to cream cheese.  Beat on low until incorporated.  Make sure to scrape the bottom of your bowl to get all of the cream cheese mixed in. 


5.  Stir together 1/2 a can of sweetened condensed milk and lime juice.  Add to cream cheese mixture and mix on low until incorporated.  Transfer batter to a large bowl.  Stir in lime zest.


6.  Wash  your mixing bowl and dry well.***  Return to mixer and add egg whites and 1/4 sugar to mixing bowl.  Using your whisk attachment, whisk on HIGH speed until meringue forms.  Once you have a thick meringue, add meringue into cheesecake batter, folding gently.  Do not over mix.  The meringue makes your cheesecake nice and light, but if you over mix, you lose the fluffiness.


7.  Pour cheesecake batter into crust.  Place in middle rack of oven.  Place a shallow pan filled with water on the rack under the cheesecake.  Bake for approximately 50-60 minutes.  Your cheesecake is done when the center no longer jiggles.  Turn off the oven, open the door several inches, and allow the cheesecake to cool in the oven.

Unbaked cheesecake


8.  Once the cheesecake has cooled, run a knife around the inside of the ring of your springform pan to release the cheesecake from the ring.  Remove ring.  Place cheeesecake in the refrigerator to cool over night. 

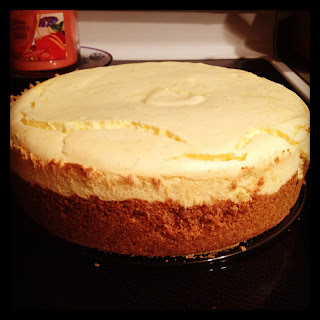
Baked cheesecake

Beautiful


9. Prior to serving cheesecake, whip one cup of heavy whipping cream in mixer on HIGH speed.  When is starts to thicken, sprinkle in a little vanilla (1/2 teaspoon max) and about 2 tablespoons powdered sugar.  You can add more powdered sugar, but for me, the whipped cream is about muting the richness of the cheesecake.  Too much sugar defeats the purpose.

Slice cheesecake and serve with whipped cream.

I don't even like key lime pie, and this was delicious.  I received a ton of compliments. 

NOTES:


*  As we don't have key limes in this neck of the woods, I googled how to make a key lime pie using regular (persian) limes.  I found a reference to a little trick about adding some orange juice to your lime juice to sweeten it up.  Apparently key limes are sweeter than regular limes.

** It is very important that you allow your cream cheese to warm up to room temperature.  Cold cream cheese does not mix well.  If you attempt to use cold cream cheese, it will clump. Then you'll have clumpy cheesecake.  And no one wants that.  This is also why you beat the cream cheese first before adding any other ingredients.  Make sure your cream cheese is smooth before you add anything else.

*** If your mixing bowl is not completely clean, your egg whites will not fluff up into meringue.  Trust me on this.  I've made the mistake of thinking it wouldn't matter before, and then got angry because my egg whites wouldn't fluff up.

I was very happy with the silicon springform pan.  I had read in reviews that they can leak.  But I did not have any problems.  The outer ring remove easily, and because the bottom is a glass plate, it can be used for serving, so you don't have to worry about transferring your cheesecake to a separate plate.

Enjoy.

Thursday, May 30, 2013

Spicy Tomato Enchiladas

Recently, two of my high school classmates started their own company.  They wanted to flex their  creative gustatory muscles and craft their own jams made with all natural, local ingredients.

Thus began The Essential Table.

After months of providing them with my (unsolicited) opinions on everything from their website to their labels, I finally had a chance to taste the final product.

This past Saturday, I attended a tasting, where I snacked on jams to my stomach's delight.

Shockingly, my favorite was the Spicy Tomato.  I had gone in thinking the Stout Beer Jam would clearly emerge the winner on my score card.  But no.  It was the Spicy Tomato I kept going back to.


And by the time I got home with my jars of jam, I knew exactly what I was going to do with it.

Enchiladas.

And let me just tell you, they were pretty darn good... if I do say so myself.  Served with sweet corn and black bean salsa and (what I'm calling) Mexican potatoes.


The enchiladas and the corn & black bean salsa are super easy to throw together.  The chicken can cook in the crockpot while you're at work, and it's a quick thing to shred it and throw together the enchiladas when you get home.  The potatoes take a little longer, so start there, and get those in the oven.  You can put together your enchiladas while the potatoes are baking.

Spicy Tomato Chicken Enchiladas:
Ingredients:
1 lb. chicken breasts
1 jar Spicy Tomato Jam from The Essential Table
1 8oz. block cream cheese (softened)
Chili powder
Garlic powder
Onion powder
Ground Cumin
Red pepper flakes
Vegetable stock or chicken stock (enough to cover your chicken breasts in the crockpot)
Tortillas (I used wheat tortillas)
Shredded cheese of your choice
White American cheese (in a block from the deli) + milk or cream

Directions:
1. Place chicken in a crockpot.  Combine vegetable stock with 2 tablespoons chili powder, 1 teaspoon each of garlic powder and onion powder, 1/2 teaspoon cumin and 1/2 teaspoon of red pepper flakes.  Pour over chicken breasts.  Cook on low for 5-6 hours or on high for 3-4 hours.  Chicken is ready when you can shred it with a fork.*

2.  When chicken is ready, chop softened cream cheese into 1 inch cubes and place in large mixing bowl.  Shred hot chicken (careful with the hot chicken, folks) and place on top of cream cheese to further soften.  Stir together chicken and cream cheese.  Add half a jar of The Essential Table Spicy Tomato Jam.  Stir until incorporated.

3.  Spoon chicken along center of tortilla.  (I used a good bit of chicken for some really meaty enchiladas.)  Top with a little shredded cheese (to your taste - I only used about a tablespoon per enchilada.)  Roll up tortilla and place seam side down in a baking dish.


 4.  Cube your white American cheese.  The amount of cheese you use is completely up to you, based on how cheesy you want your enchiladas.  I like a good bit of cheese, and I used approximately 1 cup of cubed cheese.  Place cubed cheese in a microwave safe bowl and add 1/4 milk or cream.  Remember, you can always add more milk to thin out your cheese sauce, but you can't take it out later.  Microwave milk and cheese in 45 second intervals, stirring in between, until cheese mixture is smooth.  Stir in 3 tablespoons of the Spicy Tomato Jam.  Pour over enchiladas.

5.  Bake enchiladas at 350 degrees for about 20 minutes.

*If you don't want to cook your chicken in the crockpot, you can always mix together your dry seasonings and rub them on the chicken, then grill the chicken and shred it.

Mexican Potatoes
Ingredients:
2 large baking potatoes (this made five Rachel size servings - which is a pretty large serving)*
3 tablespoons melter butter OR butter alternative spray OR 3 tablespoons olive oil**
Extra olive oil for your baking sheet
2 Tablespoons chili powder
1 teaspoon onion powder
1 teaspoon garlic powder
1 teaspoon ground cumin
1 tablespoon ground sea salt

Directions:
1.  Preheat oven to 450 degrees.

2. Cube baking potatoes into 1 inch chunks.  Place cubed potatoes into bowl, pour or spray butter/oil over potatoes and stir to coat all potatoes.

3.  Stir together all seasonings.  Sprinkle half the mixture over potatoes and stir well to coat potatoes.  Add remainder and stir again.

4.  Brush large baking sheet with olive oil (the potatoes will stick if you don't use a liberal coat of olive oil).  Spread potatoes in an even layer on baking sheet.  Bake for 20-25 minutes, using a spatula to turn potatoes at the halfway point.***

Reduce the heat in your over to bake those enchiladas you put together.

*If you don't have baking potatoes, use whatever kind of white potato you have on hand and just chop up as many as you need.

**  I use a butter alternative spray.  Because I'm lazy, and it's easier than melting butter.

***  I like my potatoes extra crispy, so I'll leave them in a little longer, but be careful.  If you don't turn them during baking, they will burn.

These turned out even better than I had hoped.  You can dip them in ketchup or your Spicy Tomato Jam.  Or you can mix some ketchup and Spicy Tomato Jam.

Sweet Corn and Black Bean Salsa:
Ingredients:
1 steam in bag frozen sweet corn*
2 cans black beans (rinsed and drained)
1 tablespoon chili powder
1/2 teaspoon onion powder
1/2 teaspoon garlic powder
1/2 ground cumin
1 cup vegetable stock

Directions:
1.  Rinse and drain black beans.  Add to medium size pot with vegetable stock and seasonings.  Stir to combine.  Bring to boil, then reduce heat to low heat.  Cover and simmer for approximately 15 minutes.  We just want those flavors to blend.

2.  Cook corn according to package directions.

3.  After your beans have simmered for a while.  Stir in your sweet corn.

* Tis the season for fresh fruits and vegetables.  If you're in the mood to shuck corn, replace the frozen corn with fresh corn.

Plate it all up and enjoy.


Thursday, April 25, 2013

Dark Chocolate Peanut Butter Truffles

Sometimes, you just need chocolate. 

You know what I mean?

Last night was one of those times for me.  But given the heavy lunch I ate yesterday, I wanted to be able to eat my chocolate, but not feel horrible about myself.

What to do, what to do...

I took stock of my chocolate possibilities, taking into account the lateness of the hour and my desire to not feel like a beached whale after eating whatever chocolate decadence I created.

I had peanut butter.  I had chocolate.

I could just melt some chocolate and dip a spoonful of peanut butter in it. 

No.  I can do better than that.

I had wanted to make peanut butter eggs at Easter and just never got around to it.  But all those recipes call for a ton of powdered sugar mixed with the peanut butter, and that gives me a cavity just thinking about it.

Oh, but I could use honey instead of powdered sugar!  Yes!  And maybe I'll toss in some oats for texture.

Sold.

I got out my ingredients and set to work...

Dark Chocolate Peanut Butter Truffles:
Ingredients:
1 cup peanut butter
1/4 cup honey (or more to your taste)
2/3 cup oats (or more to your taste - I like a good bit of oats)
Chocolate

1. Stir together peanut butter and honey until well combined.  Stir in oats.Place mixture in fridge for at least one hour or in freezer for about 20 minutes.  You want to give it plenty of time to firm up.

2.  Once peanut butter mixture is firm, melt chocolate according to package instructions (see note at bottom).

3.  Line baking sheet with wax paper or parchment paper.  Scoop 1 tablespoon balls (or whatever size you like) of peanut butter mixture with cookie scoop or spoon.  Roll into ball.  Dip in chocolate, coating entire ball.  Place on baking sheet.  Repeat.  (If you're like me, you pour any leftover chocolate over your truffles for an extra coat of deliciousness.)

4.  Place baking sheet in refrigerator or freezer until chocolate hardens.  Store in refrigerator (there's nothing in them that requires refrigerating, it's just to keep your chocolate from melting).  Or if you can somehow refrain from shoving them all on your mouth, you can freeze them and thaw them for a snack when you need a hit.

Note:  There are tons of chocolate options open to you.  I use Ghirardelli melting chocolate.  My mom bought me a gigantic three pound bar for Christmas... no joke.  I just break a piece off, chop it up and melt it in the microwave, stirring frequently.  Easy peasy.  Baker's Chocolate is also perfect for melting.  You can also buy Baker's Chocolate in handy dandy cups you can stick directly into the microwave.  Or in a pinch, you can use good old fashioned chocolate chips.  Although if you go that route, you need to add some kind of fat (butter, oil, lard) to the chocolate for a smooth consistency when you melt it.  Usually about a tablespoon per cup.  Just follow the package directions. 

Wednesday, March 13, 2013

Do you know the muffin man?

Today's post is a twofer.

Which is only fair, as I haven't posted anything in a while.

A couple of weeks ago, my baby boy (and in case you don't know, by baby boy, I mean my dog) celebrated his 7th birthday.

Every year, I make him cake... and every year, I end up burning it.

He always eats it anyway.  Because hello! He's a dog.  He doesn't care if it's burnt.  But this year, I was determined to make him non-burned birthday cake.

I perused some recipes for dog safe cake, as I do every year.  But I just couldn't find anything I really liked. 

Then I realized that I really didn't need a recipe.  I could wing it.  And if it didn't work out... well, no harm, no foul.  I mean, he's been eating burnt cake for six years. 

Shockingly, it did actually turn out.  Except instead of being fluffy like cake, they were denser, like a muffin. 

Here's what I did:

Peanut Butter Muffins

1/2 cup peanut butter
1/2 vanilla fat free yogurt
1/3 cup honey
1 egg
1 t vanilla
1 cup flour
1 t baking powder

1.  Stir together peanut butter, yogurt, honey and vanilla until smooth.  Add in egg and stir until well mixed. 

2. Whisk together flour and baking powder.  Add to wet ingredients and mix until just combined.

3. Pour into greased muffin tins (about 3/4 full) and bake at 350 degrees for 15-18 minutes.  I used a king sized muffin tin and baked for approximately 20 minutes.  I also made a batch in a mini-muffin tin and only baked for about 10 minutes.  Adjust for the size of your muffins, and bake until a toothpick inserted into the center of the cake comes out clean.

4.  After removing from oven, turn muffins out onto a wire rack to cool.  Don't leave them in the hot muffin tin because they will continue to cook.


As you can see, they were a big hit.

They certainly had Winston's seal of approval, but I wanted to know if they were any good from a human perspective.  

So I had one for breakfast the next morning.  

And it was great.  Except it needed a little something more.

Like chocolate.  So I made them again and added a cup of chocolate chips.

Perfection.

I brought some into the gym the next day for friends, and the people in my spinning class wanted to know what exactly a person had to do to get some muffins.  So I promised to make them muffins the next week.

Except the night before I was supposed to produce said muffins, I realized I had forgotten about my promise.

And also, I didn't have the ingredients to make peanut butter muffins!  No peanut butter.  No yogurt.

What's a girl to do???

I fell asleep that night thinking about the ingredients I had at my disposal.  Because necessity is the mother of invention.

And this is what I came up with:

Banana Oat Muffins

1 LARGE banana
1/2 c applesauce
2-3 T honey
1 egg
1/2 c. flour
1/2 old fashioned rolled oats
1 t baking powder

1.  Mash your banana until it's mush.  If you don't have a large banana, use 1 1/2 medium banana or 2 small bananas.  Add in applesauce, honey and egg.  Whisk until well mixed.  

2.  Whisk together flour and baking powder.  Add to wet ingredients and mix until combined.  Stir in oats.

3.  Pour into greased muffin tins (about 3/4 full) and bake at 350 degrees for 15-18 minutes.  Again until a toothpick inserted in the middle of hte muffin comes out clean.

I'm not even a big fan of banana, and these were delicious.  They would have been even more delicious with some walnuts.  If you're so inclined.

So there you go.  Two healthy muffin recipes to try.  No oil!  No sugar!  Only 1 egg and limited flour!

Go forth and bake and amaze your friends and family with your skills.


Wednesday, February 20, 2013

Chicken & Dumplins

Remember that rotisserie chicken from our chicken tortilla soup?  And I told you that I love rotisserie chicken because of all the things you can do with it??

Well now I'm going to share another one of those uses with you.

Whether you've purchased your chicken as a main course for your meal or to use the meat in a recipe, after you've picked all the meat off the bird DO NOT throw away the carcass!  (Btw, this also applies if you've roasted your own chicken.  Just fyi)

After you've pulled off all the meat, toss everything that's left (skin, bones, everything) into your dutch oven (I told you I love my dutch oven) or a large pot.  Fill the pot with enough water to cover the remains of your bird.  For reference, my dutch oven is 6 qt, and I fill it to about 2 inches from the top.

Now, as I'm sure you know, chicken broth is very bland.  Which is why it's good for upset tummies.

But we want flavorful, hearty stock.  So we're going to add a couple ribs of celery (it can be whole or chopped into large sections), some carrots (chopped into large pieces), a couple of cloves of garlic (smashed and skinned), and some onion.  Season liberally with salt and pepper.

If you don't have these things on hand to season your chicken stock, you can substitute with celery seed, garlic powder and onion powder.  If you are using spices instead of fresh vegetables, don't be afraid to use a heavy hand.  A sprinkle is not going to give you a very flavorful stock.  I'd recommend starting with 2 t. of each.  And don't forget to salt and pepper.

It's everyone into the pool.  Cook on high heat until it starts to boil.  Then reduce heat to low, cover and let simmer for about 8 hours.

Yes.  It takes a very long time to make good chicken stock.

However, as I'm usually using the rotisserie chicken for dinner, afterward I just throw everything together for my stock before I go to bed and let it simmer while I dream sweet dreams of homemade chicken and dumplins.

In the morning, you have lovely chicken stock for use in your recipes.

Let it cool.  Then run it through a strainer into a large bowl or pitcher.    If, like me, you have a colander with large holes in it,  you can put a piece of cheesecloth or a paper towel in the bottom of your colander to strain out all the chicken bits and veggies.

You can use it right away, store it in the fridge in an air tight container (up to a week), or freeze it in freezer safe containers for up to 6 months.

As I spent the night dreaming of chicken and dumplins, I was going to use some of my stock right away.

Chicken & Dumplins:
What you'll need:
3 cups of chicken stock
2 1/4 cups all purpose flour
1 t baking powder
sale
3 T cold butter
1 cup milk
extra flour for rolling out dough
cooked shredded chicken

Heat your chicken stock in a dutch oven or large pot on high heat.  While this is working up to a boil, you're going to make your dough.  (Be sure to taste your chicken stock.  You can add more herbs and spices at this point to season it.)

In a medium bowl whisk together flour, baking soda and a LARGE pinch of salt.  Slice your butter into small pieces.  Cut butter into flour mixture until it starts to resemble a coarse meal.  Pour your milk into the flour mixture; work it with a fork until all flour is incorporated into dough.  The dough will be very wet and sticky.

Divide dough into half and roll out each portion on a HEAVILY floured surface.  Don't be afraid to overdo on the flour.  Extra flour on your dumplins is good because it'll thicken up your stock.  Roll your dough to about 1/8 inch thickness (or thicker if you like a nice thick noodle) Slice your dough however you wish.  I tend to do 3x3 just because that's how my grandma always did it.

Drop pieces into boiling broth, stirring occasionally so your dumplins don't stick together. 

Once you've added all your dumplins, reduce heat to low and let it cook for just a couple of minutes to make sure your dumplins cook through.  This is the point where you add in your chicken.  Then remove from heat.  As it cools, your stock will thicken.

I like to serve mine with biscuits.

Because what chicken & dumplins needs is even more carbs.


Tips & Tricks:
Stock:
You can season your chicken stock with whatever floats your chicken boat.  Basil, oregano, thyme, rosemary, bay leaves (man I hate bay leaves).  The possibilities are endless.  You know what you like.

Opinions differ on how long to cook your stock.  Some people only do it for a couple of hours.  I'm a fan of low and slow.  In my experience, I get the best stock when I simmer on very low heat for an extended period of time.

Dough:
Cutting in butter- I use a pastry blender, and let me tell you, it's a game changer.  Well worth the $10 investment.

My grandma used shortening instead of butter, but every time I even look at shortening, I imagine it building up in my arteries.  She also used water instead of milk, so if you have dairy allergies, you can easily sub water in your dough

Rolling out dough:
I hate, and I mean HATE, working with dough.  I've always hated having sticky stuff on my hands.  The trick is to spray your hands with cooking spray prior to picking up your dough.  I bought an oil mister you can fill whatever type of oil you prefer.  Love it.  Instead of paying $5 for a can of cooking spray, now I just fill my mister.

Another reason I hate working with dough is the clean up.  Oy the mess.  I bought a pastry mat.  Much easier.  You can keep everything on the mat, then just dump all the leftover flour into the sink.  In lieu of that, you can tape down wax paper.  Or you can say "Screw the mess! I'm going old school!" and roll out the dough on your counter top.

Tuesday, February 19, 2013

Spinach & Chickpea Quinoa with Balsamic reduction

When I was in law school, most of my meals were meat free.  Not because of any personal beliefs or ideals.  It was much more basic: meat is expensive, and I was poor.

Even before that, I was never a big meat eater.  Especially red meat.  I feel like it weighs me down.

Plus I'm really crap at cooking red meat... although I'm getting better.

And I can cook the hell out of a chicken breast.  Just thought I'd throw that out there.  Chicken is easy.  You can add pretty much anything to it and make it work. (I said that in my Tim Gunn voice.)

But some nights, you just want something light.  Light but filling.  You know?

Ergo, Spinach and Chickpea Quinoa.

This dish was inspired by my friend Devon.  She's a vegetarian, and I like to tease her with my recipes.

Quinoa is my new food love.  If you are not familiar with it, it's a grain like crop.  Like rice.  Except it's not a grain.  It's a seed.  And it's chock full of good stuff, including lots of protein.

We like protein.

And chickpeas (aka garbanzo beans), are also high in protein.  Yay proteins!  Chickpeas are a very meaty, filling bean.  Fills you up and good for you.  Win/win.

Spinach and Chickpea Quinoa with Balsamic Reduction
What you'll need:
Uncooked quinoa
Vegetable broth
1 bag frozen spinach
1 can chickpeas
1 cup balsamic vinegar

1. In a small saucepan, bring balsamic vinegar to a boil.  Reduce heat and simmer for approximately 20 minutes, stirring occasionally until vinegar thickens and coats back of spoon.

2.  While your vinegar is simmering, cook your quinoa.  Read the directions on your bag of quinoa.  Some brands require that you soak your quinoa prior to cooking to remove the saponins.  If your directions require this step, do not skip it.  Otherwise, your quinoa will be bitter.  Many brands treat the quinoa prior to packaging to remove the saponins, so you can skip this step.  Every brand of quinoa I've used calls for the same liquid to quinoa ratio - 2:1.  If you use 1/2 quinoa, you use 1 cup of liquid.  The directions on the bag call for water.  Substitute broth for water.  If you want to make your meal herbivore friendly, use vegetable broth.  If not, you can use chicken broth.  This just gives your quinoa some extra flavor.  So add your quinoa and broth to a pot, bring it to a boil, then reduce heat, cover and simmer for about 15 minutes or until broth is absorbed.

3.  After you have 1 and 2 started, cook your spinach.  If you read my first post, you know I'm a big fan of quick and easy.  Therefore, I like to use steam in the bag vegetables.  Including spinach.  If you can't find steam in the bag spinach, most bags of frozen spinach have microwave cooking instructions.  If you have the time (which I usually don't), you can steam or saute fresh spinach with some olive oil and garlic.  I'm determined to do this on a weekend when I have more time.  Because it sounds delish.

4.  Drain and rinse your chickpeas.

5.  Plate cooked quinoa, top with spinach and chickpeas.  Drizzle your balsamic reduction over everything and prepare your taste buds for the orgasmic pleasure.

Okay fine.  Maybe I embellished that last sentence.  But this dish contains some of my favorite things.  This girl gets excited over legumes.


Tips & Tricks:

I absolutely LOVE quinoa.  It's incredibly versatile.  I use in in place of rice and pasta in recipes.

If your grocery store sucks (like mine), you may not find canned chickpeas in the aisle with the rest of the beans.  Check the ethnic food aisle.  They'll definitely have them there.  Chickpeas are delicious and can be eaten right out of the can without any further cooking.  However, if you'd like a little extra something something, I'd suggest you roast your chickpeas.

Roasted Chickpeas
1 can chickpeas (drained, rinsed, patted dry)
1 Tbls olive oil
seasonings of your choice (I suggest a little sea salt and garlic powder)

Stir together oil & seasonings in a medium bowl.  Add chickpeas and toss until coated.  Spread in a single, even layer in a baking sheet and bake at 425 for 20-25 minutes, stirring occasionally, until nice and crispy.

You could also try these sweet roasted chickpeas.  Or if you're sauteing fresh spinach, you could toss your chickpeas in there also.

Tons of possibilities.  If you try your own variations, please let me know in the comments.


Wednesday, February 6, 2013

Chicken Tortilla Soup

Hello! Welcome to the inaugural post at The Cutthroat Culinarian.

By the way, lots of love to Squarer Pegs, Rounder Holes for the name suggestion.

And to my friend Marty for making me feel my food is good enough to share.

Most of you know me as Rachel from The Rachel Chronicles: The True and (Un)Amazing Adventures of a Girl and Her Dog.  And you're probably wondering why in the world I'm starting another blog when I barely post on the one I already have.

Good question.

And I don't really have a good answer.  Other than, because I can?  Because I love food?  Because I have an overinflated sense of self and believe people want to read what I write?

Take your pick.

Don't let this blog fool you though.  I am not exactly what you would call a "great" cook.  Far from it, actually.

If I stick to food I grew up eating, I do okay.  But a girl has to spread her wings and fly.  You know?  There's a great big world of food out there.  And I want to eat my way through it.

However, as I will never be able to visit all the places I see featured on The Cooking Channel and The Food Network (even though I do keep a list of "Must Eat Places" on my phone), I have to learn to make some of these things myself.

And I'm getting better.  It used to be when I made dinner, there was a 50/50 chance it would be edible. Now I'm probably up to 70/30 in favor of edible. (My boyfriend may disagree with my figures... but he'd never say it to my face.)

And while I may not be a great cook, I AM a great baker.  If I do say so myself.

So this blog will be a hodgepodge chronicling my kitchen journeys.  The good.  The bad.  The OMG open the windows and take the batteries out of the smoke alarm.

Trying out my own creations.  Trying out other people's creations.  What worked.  What didn't.  Dinners.  Desserts.  Snacks.  Tips.  Tricks.  Healthy.  Sinfully delicious and decidedly unhealthy.  The herbivore friendly.  The omnivore friendly.

We'll have it all.

And the plan is to get some guest bloggers in here to share their own kitchen adventures.

To start it all off, I'm featuring one of the few non-dessert related recipes people ask me for quite often.  You see, one night a few months ago, I had a craving for chicken tortilla soup.

Which was weird because up to that point, I had never even eaten chicken tortilla soup....

And I had no idea where I could obtain such a thing in my not so bustling metropolis.

The only option was to make it myself.  And it needed to be quick and easy.  After my day job, I spend two hours a day at the gym, then home to walk the monster dog.  So dinners have to be quick to make.  Otherwise, I'm eating a sandwich.  So I started with my friend Shannon's chili recipe (I'm hoping she'll be one of my guests...) and adapted it for my purposes.

Here's what you will need:
2 chicken breasts, cooked and shredded
1- 28oz. can crushed tomatoes
2-3 1/2 cups chicken stock/broth
1 can kidney beans
1 can great northern beans
1 can black beans
1 bag frozen sweet corn
packet McCormicks Mild chili seasoning
Adobo sauce
chili powder
garlic powder
brown sugar
shredded cheddar cheese
tortilla chips

Add crushed tomatoes and chicken broth (2 c. for more stew like, 3 1/2 c. for soupier) to a 6 qt Dutch oven (or pot) on medium heat.  Add half the packet of chili seasoning, 2 t. of chili powder,  1 t. garlic powder, 1 t. adobo sauce, and a sprinkle of brown sugar.  Rinse and drain all beans, add to Dutch oven.  Stir in frozen corn and shredded chicken.  Increase heat and bring to a boil.  Once soup begins to boil, reduce heat, cover and simmer for 30 minutes.  After it has a chance to cook for a little while, taste it and add more of whatever spices you'd like.

Serve topped with shredded cheese (sour cream would be good, too) and tortilla chips.

Tips & Tricks:
The Dutch oven is, in my humble opinion, the best kitchen invention EVER.  If you do not have one, you should consider investing in one.  I use mine all the time.  Seriously.  I have a Lodge Dutch oven.  And many of my recipes will utilize a Dutch oven, but obviously you can substitute with a pot (or even a crockpot) or casserole dish much of the time.

Because I'm often struck by odd cravings, I rarely plan ahead for meals.  The beauty of this soup is, I can use a rotisserie chicken from the grocery store instead of taking the time to cook chicken for my soup.  Rotisserie chicken is one of my favorite grocery store tips.  They range from $6.50-$7.50.  It can be a meal in itself.  Or you can pick the chicken apart for use in recipes, then use the carcass to make your own chicken stock (more on that later).  It's a pretty good deal.

As I've said, my hard and fast rule is that recipes need to be quick and easy.  I want good food, but I don't have a lot of time to make it.  Therefore, a lot of my recipes will contain easy and convenient ingredients.  If you can substitute ingredients for a "cleaner" recipe, please do and share your own tips.  For example, if you have a garden (and the stupid deer don't eat it all), you can can your own tomatoes for use in recipes.  Also, there are several websites that provide recipes for your own seasoning mixes so you can skip the store bought.  I just haven't had a chance to stock up on my own, but hopefully soon, I'll have time to mix some up.

I have out of control acid reflux that often makes my throat burn hotter than the fires of Mount Doom.  So you'll very rarely find me posting a recipe for spicy foods.  The beauty of this recipe is it's very easily adaptable.  If you want it spicier, instead of using just adobo sauce, opt for chiles in adobo sauce and dice up one of the chiles and toss it in the pot, too.  This is a basic soup you can tailor to your own tastes.  Have fun with it.

Also, if you use less chicken broth for a thicker stew, this makes a good "dip" to use as an appetizer or at a party.  And as with any soup, the flavor is better on day 2.

This blog is a work in progress.  I would say most of the early posts will not have pictures because they're things I've made in the past, and I'm just posting from memory.  As I make them again in the future, I'll go back and add in pictures.  I'll also attempt to figure out how to add in those handy dandy recipe cards you can just print off.

If you have any suggestions, please feel free to share.

Thanks for visiting.  Happy eating.